

An I do, we do, you do lesson plan divides a lesson by who is doing the thinking. First the teacher does it while students watch, then teacher and students do it together, then students do it alone. The idea is simple, but the timing is where new teachers struggle. A 60-minute period leaves little room for error, and a lesson that runs ten minutes long in the first stage has nothing left for the last one.
This walkthrough defines each stage, gives a minute-by-minute split for a 60-minute lesson, lists the mistakes that cause the method to fall flat, and ends with a template you can fill in for tomorrow.
What “I Do, We Do, You Do” Actually Means (and Where It Comes From)
The method is a classroom version of what researchers call the gradual release of responsibility. P. David Pearson and Margaret Gallagher described the model in 1983 in the context of reading comprehension. It draws on earlier work on scaffolding and on Lev Vygotsky’s idea of the zone of proximal development: the range of tasks a learner cannot yet do alone but can do with support.
The practical meaning is that support should be removed in stages. Students should not be handed a skill and told to start, and they should not be supported forever. Teachers have shortened the model to three phrases:
- I Do: you model the skill and explain your thinking while students watch.
- We Do: you and the students work problems together, with your support shrinking as they get more accurate.
- You Do: students practice on their own while you check whether they can do it.
Some versions, such as the one Douglas Fisher and Nancy Frey describe, add a fourth stage between We Do and You Do, where students work with a partner or small group. It is a useful addition, and it fits inside the We Do block of the plan below.
I Do: Modeling the Skill Without Talking Too Long
In I Do, students watch an expert work. The goal is not to cover everything about the topic. It is to show one skill, done correctly, with your reasoning spoken aloud so students can hear the decisions behind each move.
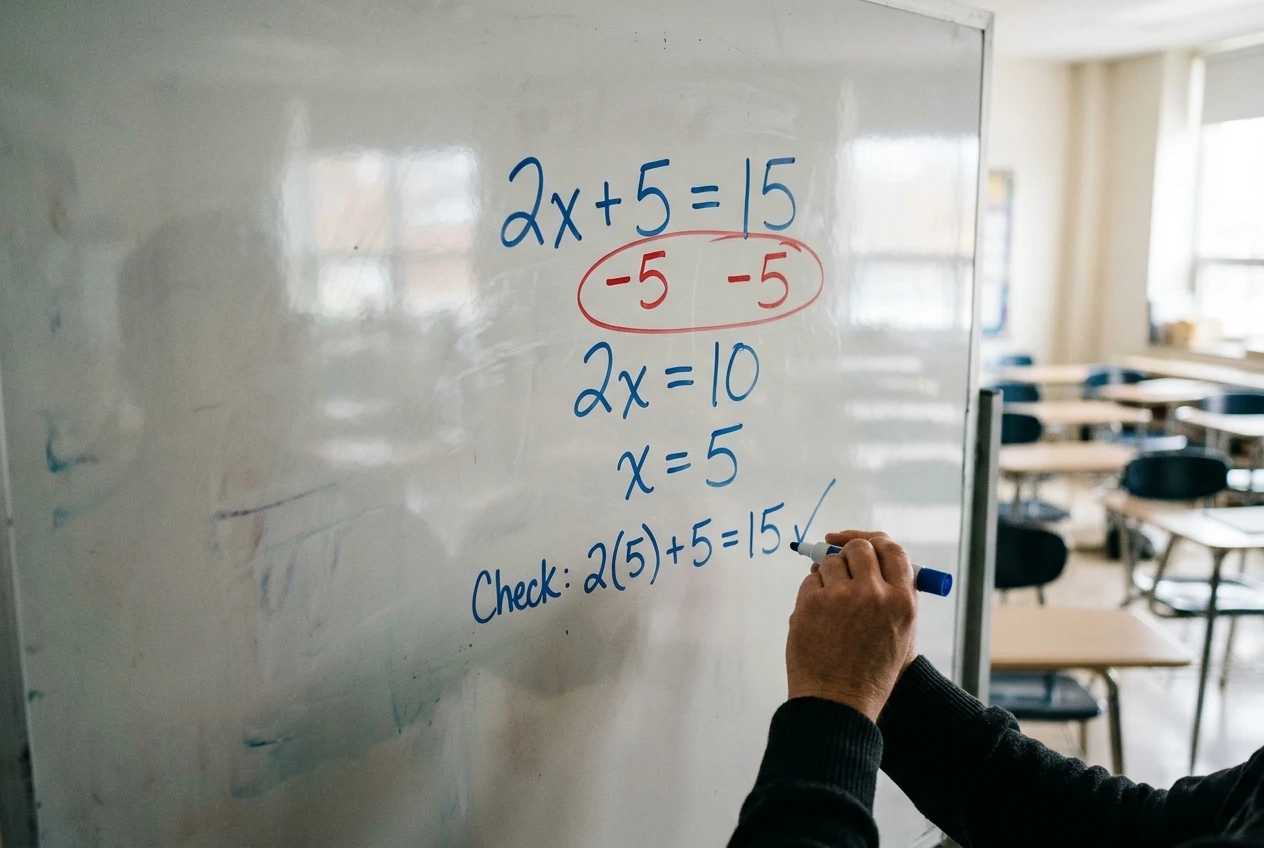
Suppose the skill is solving two-step equations. A model that works looks like this: write the equation, say “I see addition, so I undo it first,” subtract, say why, then check the answer by substituting it back. You are showing the procedure and also the habit of checking. Students who only see the steps will copy the steps. Students who hear the reasoning have something to apply when the problem looks different.
Keep it to about ten minutes
Ten minutes is a planning target, not a fixed law, but attention drops quickly during teacher talk. A few things keep I Do short and useful:
- Model one skill or one clearly bounded piece of a skill.
- Use two or three examples, and make the second slightly harder than the first.
- Write the steps where students can see them, and leave them up for the rest of the lesson.
- Ask a few quick questions while you model (“What do I do next, and why?”) so students stay mentally active.
The most common error here is length. A teacher who knows the material well wants to explain every exception, and students end up listening to a lecture when they needed a demonstration. If you find a fourth example creeping in, move it to the We Do stage and let students do the work.
We Do: The Stage New Teachers Skip, and Why It Carries the Lesson
We Do is where students first attempt the skill, and it is where you learn whether they understood your modeling. It sits between watching and doing alone, and a lesson with no We Do asks students to jump from observation to independent work with nothing in between.
New teachers skip it for understandable reasons. The modeling went smoothly, a few students nodded, and it feels like the class is ready. But nodding during a demonstration shows attention, not ability. Many students only discover what they do not understand once a pencil is in their hand.
What We Do looks like in practice
Start with a problem you do together. Students try each step, and you prompt rather than tell: “What’s our first move?” Then give a second problem where students lead and you step in only when they stall. A third problem might go to partners, with you walking the room.

Use a quick check on every problem, such as mini whiteboards held up on your signal, or a thumbs response paired with a written answer. A show of hands alone tells you who is willing to speak. Whiteboards or written answers tell you who is right.
This is also where you correct errors cheaply. A mistake caught on the second guided problem costs thirty seconds. The same mistake found on a finished worksheet costs a re-teach, and by then twenty-five students may have practiced it twenty times.
Plan about twenty minutes for We Do. It is the longest stage because it does the most work: students practice, you gather information, and you adjust the lesson based on what you see.
You Do: Independent Practice That Shows Whether the Lesson Worked
In You Do, students work alone and you stop leading. The task should match what you modeled and practiced together, at the same level of difficulty or a small step beyond it. Introducing a new type of problem here defeats the purpose, because you can no longer tell whether a wrong answer came from the skill or from the surprise.
Your job during this stage is to circulate and look at work. Check the first few problems of students who are likely to struggle, then those of students who tend to finish quickly. Make brief notes on patterns: three students making the same sign error tells you what to open with tomorrow.

Plan about twenty minutes, including a short closing check. An exit ticket of one or two problems collected at the door gives you cleaner evidence than the practice set, because you can be sure each student worked it alone.
Give early finishers something to do. A short extension problem or a request to explain their reasoning in writing keeps them busy without introducing a new skill that you would then have to teach.
How to Split a 60-Minute Lesson Across the Three Stages
Here is a split you can use as a starting point. Adjust it to your students, your subject, and how much review the skill needs.
Minutes Segment What happens 0 to 5 Opening Quick review problem or question that connects to the skill. State the goal of the lesson. 5 to 15 I Do Model two or three examples, thinking aloud. 15 to 35 We Do Guided problems, then partner work, with checks for understanding on each. 35 to 55 You Do Independent practice while you circulate and note errors. 55 to 60 Close Exit ticket, collect it, and tell students what comes next.
The pattern is roughly 10, 20, 20, with five minutes at each end. The three stages together take fifty minutes, and the opening and close hold the lesson together. If a period includes announcements, transitions, or a late start, the first thing to shorten is the opening, followed by the length of the You Do set. Do not shorten We Do, because it is the stage that decides whether You Do will work.

Some lessons need a different ratio. A brand-new, difficult skill might call for a longer We Do and a shorter You Do, with the remaining practice assigned the next day. A review lesson on a familiar skill might shrink I Do to five minutes. The structure stays the same; only the proportions change.
A timer helps. Set it visibly for each stage during your first few lessons. Most new teachers find that they run long in I Do, and a timer shows it immediately.
Five Missteps That Happen When You’re Not Intentional
1. Talking too long in I Do
Every minute of extra explanation is a minute taken from We Do or You Do, where students are actually learning to do the task. If modeling stretches past twelve or fifteen minutes, cut an example and move to guided practice.
2. Skipping We Do
This is the largest cause of lessons that look fine and produce poor independent work. If your students did badly on the practice set despite a clear explanation, check how much guided practice they had. Often the answer is none.
3. Releasing to You Do too early
Release when students are getting guided problems right without much help from you, not when time runs out. A useful test: if more than a few students need your help on the last We Do problem, do another one. It is better to give up five minutes of independent practice than to send students off to rehearse errors.
4. Changing the task between stages
If you model with one type of problem, practice with another, and assign a third, students are learning three things at once. Keep the task consistent through all three stages and raise the difficulty gradually.
5. Treating the stages as a script instead of a decision
The method only works if you respond to what you see. If the whiteboards show that half the class is wrong, you do not move on because the plan says minute 35. You model again, briefly, or reteach one step, and then continue. The time split is a plan, and the evidence from students overrides it.
A Simple Planning Template to Use for Your Next Lesson
Copy this into a document and fill it in before each lesson. It takes about ten minutes once you are used to it.
Skill (one sentence): What will students be able to do by the end of the period?
Opening (5 minutes): One review question or problem tied to the skill.
I Do (10 minutes):
- Examples I will model (two or three, in order of difficulty):
- Key reasoning I will say aloud:
- Questions I will ask during modeling:
We Do (20 minutes):
- Problem 1, done together:
- Problem 2, students lead:
- Problem 3, partners:
- How I will check each one (whiteboards, written answers):
- Common errors to watch for:
You Do (20 minutes):
- Independent task, matched to what we practiced:
- Extension for early finishers:
- Students whose work I will check first:
Close (5 minutes):
- Exit ticket (one or two problems):
- What I will do with the results tomorrow:
Filling in the “common errors” line is worth the effort. Working the problems yourself before class shows you where students are likely to slip, and you can build a prompt for that spot into We Do.
After the lesson, add one note at the bottom: which stage ran over or under, and why. After a week, your notes will show whether you consistently run long in I Do or rush through We Do, and you can adjust the next plan with real evidence.
If you want help applying the method to your own subject, grade level, and class schedule, consider scheduling a support call to talk through how to put it into practice in your classroom.